Back to 'Digital microscopy'
Orientation, formatting and storage
The following are suggestions. I hope they're helpful. My searches through the Web suggest that they are not superfluous, but better ideas may evolve.
Principles
back up- Images of similar diatoms should as far as possible be presented in the same orientation, to facilitate comparison
- books are generally taller than wide
- computer screens are generally wider than tall
- pixels are (generally) square, so that reorientation in multiples of 90 degrees is easy, but other manipulations require digital 'reinterpretation' of the image, which will cause some degradation
- the cost of storing images is not negligible, but it will decrease; our time is more precious
- the most labour-intensive part of photomicroscopy (digital or conventional) is usually finding the specimens to photograph; re-taking photographs is undesirable and often impossible. However, the information should be available to let people try.
- images can be improved in contrast and brightness, and to some extent they can be sharpened. However, if the detail is not there in the first place, it can't be sharpened, made brighter, more contrasty, etc
- images without indication of scale have limited use
- if you take a lot of trouble to take an image, it makes sense to treat it well and store it securely (cf money)
Application of principles
back upCapture the image at the highest definition possible (pixels per feature) . Even with high magnification oil immersion lenses, it is unlikely that you will have much superfluous information in the image
- if possible, orientate the diatom parallel to one or other axis of the picture at capture. It is usually possible to rotate either the camera or the microscope stage
- do not orientate the diatom at a diagonal to 'save space'. In fact, it ismore expensive in terms of pixels and hence bytes, and comparing diatoms at all sorts of angles is not a pleasure. Furthermore, if the images were ever to be published, they would almost certainly have to be reorientated to vertical or horizontal anyway, with concomitant image degradation.
- What if I can't do this?
- What if the image won't fit into the frame unless it is at a diagonal, or won't fit at all?
Examples
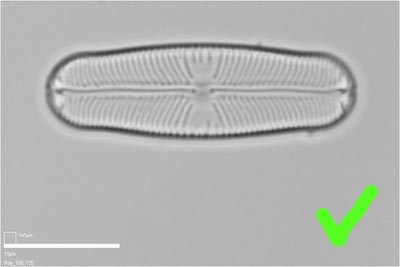
Good
This Sellaphora blackfordensis valve has been orientated with its long axis parallel to the horizontal axis of the image. A scale bar has been burnt onto the image (in this case via a macro written in the Optimas image analysis software that we used to manage image capture). However, enough space has been left to allow the scale bar to be trimmed off and replaced with something more aesthetic, or more appropriate (if the image were rotated through 90 degrees into 'portrait mode') before publication.
Very often, however, micrographs are taken with suboptimal orientation...
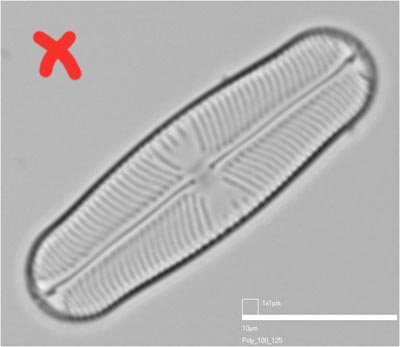
Bad
Orientating the valve at a diagonal may be inevitable, if the camera and microscope stage are fixed. However, although it looks neat (with the scale-bar tucked into a corner) it takes up more storage space, cannot be reorientated without losing the corners of the image, and the scale bar cannot be trimmed off without making digital 'repairs' to the image.
Application of principles (continued)
back up to 'Application of principles'- because most images will in future be captured and communicated electronically, it makes sense to get used to pennate diatoms in 'landscape' orientation. Most images in books have hitherto been in 'portrait' orientation, because most books are taller than broad.
- bad images waste time in 'rescue' processing and annoy colleagues. It really is worth trying to get a good image in the beginning.
- but in case you decide later that the image is unsatisfactory, or you lose the image in the aether, always record what the specimen is and exactly where it is. Most microscopes have a calibrated stage, with x and y vernier scales enabling location of specimens to the nearest tenth of a millimetre. If you know which way around to put the slide back in, it should be possible to go back to particular specimens, if you need to. Also, if you know the microscope coordinates of a specimen, you can use an England Finder to tell other people how to find it. If you are in any doubt about how to re-locate an unusual or puzzling specimen, take context photographs at lower magnification.
- record how the image was captured. You should record information on the microscope, objective, any intermediate magnification changer, filters, optical system, camera. For example, for our microscopes we would record e.g. 'Polyvar 2' (the photomicroscope), ×100 (objective), ×1.25 (intermediate magnification), 'green built-in' (a particular filter in the Polyvar), DIC (optics), and Polaroid DMC (to be honest, I usually forget the last one, so that in future, people would have to deduce what was used by knowing what equipment we had at different times and checking this versus the date of acquisition of the image). All this can be written into a spread-sheet; some software and image formats allow image information to be written into the electronic image file.
- you may wish to trim excess background from the image to save bytes. However, always bear in mind the uses you or others might want to make of the image. For example, you might want to assemble a composite image for publication, showing the effects of size reduction. To do this well, all the images would ideally need to be as long as the longest valve you are illustrating (see example; the scale bar is 20 µm).
- it is best to burn a scale bar onto the image during or immediately after capture. If you don't want an unattractive scale bar on your image, make the image a bit bigger than you intend to use, so that the scale bar can be cut off later.
- store the captured image without alteration, uncompressed (raw) or in a format that uses a loss-less compression method (e.g. TIFF, .tif). Do not use JPEG (.jpg) to store the primary image. Keep the originals intact and only manipulate copies of them
- if the image is black-and-white, check that you are storing it as a grey-scale (gray-scale) image, not a colour image (e.g. RGB). Colour images take three times the space.
- store the images and the information that describes them securely, on a server or computer that is regularly and properly backed up
- when you want to send images to someone else, especially if you are sending them by email (alternatives are via ftp, or by sending CDs or DVDs), compressing them (e.g. by using one of the 'Medium' or 'Low' quality options in JPEG) may be a good idea. In Photoshop you can monitor the effect of compression and choose a appropriate level.
Re-orientating images
back upIf you have a microscope that lacks a rotatable stage and has a fixed camera orientation, then you will have no option but to image diatoms in whatever orientations they present themselves. In this case, the main thing to bear in mind is that someone, some day, may need to re-orientate your image, perhaps for publication, perhaps to facilitate comparisons with other diatoms. So, try to capture sufficient of the surroundings of each diatom that re-orientation will be possible later, without losing the corners of the image.
In full versions of Photoshop, accurate re-orientation is extremely simple. Select the Measure Tool (if you don't usually use this, look below the Eyedropper) and draw a line parallel to the axis you wish to be horizontal or vertical. Then choose Image, Rotate Canvas, Arbitrary and you'll find the angle of the line already entered. All you have to do is select whether you want to rotate clockwise or anticlockwise.
Demonstration
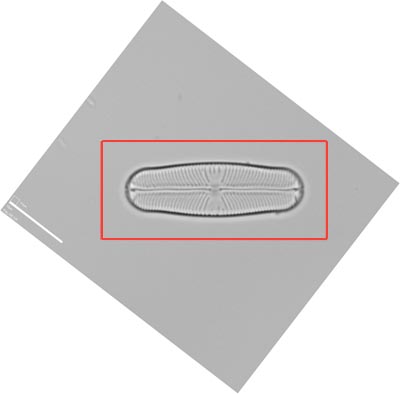
This Sellaphora blackfordensis valve has been photographed with enough surroundings to allow re-orientation parallel to the horizontal axis of the image.
Use of the 'Measure' and Rotate Canvas' tools in Photoshop allows accurate reorientation of the image. Excess background can then be cropped from the image, leaving a filled rectangular image suitable for publication, as below.