Recording images of diatoms
- Drawing
- Photomicroscopy
- Filters for black-and-white microscopy
- Digital microscopy
Digital imaging of diatoms
back upWe have summarized various aspects of digital imaging of microalgae in a paper [Bayer, M.M., Droop, S.J.M. & Mann, D.G. (2001). Digital microscopy in phycological research, with special reference to microalgae. Phycological Research 49: 263-274]
- Advantages of digital imaging
- Digital image basics
- Digital images versus film
- Choosing the right focus
- Protocols for photomicroscopy
- Removing dust specks and other artifacts
- Orientation, format, and storage
Advantages of digital imaging
back upDigital imaging technology has a number of significant advantages over conventional, film-based photography:
- Image acquisition and reproduction are relatively simple and quick and, providing common-sense precautions are taken, there is less scope for error and suboptimal outcomes.
- Digital images can be edited and enhanced in sophisticated and reproducible ways, using the algorithms built into image analysis and image processing software. Montages of images and plates with multiple images can be assembled easily for submission to journals, without the need for intermediate output as hard copy.
- Digital images can be annotated as required, have scale bars added manually or automatically, and freed of artifacts caused by dust or uneven illumination.
- Digital images can be stored in searchable databases, thus allowing fast and effective retrieval of information, combined with the potential for storing large amounts of data. In the past, taxonomic work – and hence all dependent research, especially in ecology, palaeoecology and biogeography – has often been hampered by the delays associated with publication in journals or books. Furthermore, books and journals are expensive and often fail to reach all of their intended audience; updates and corrections are slow or impossible. New Web-based iconographs have the potential to revolutionize the dissemination of taxonomic information for diatoms.
- Space constraints are essentially nil.
- Digital images can be used for morphometric analysis of microalgae by means of image analysis and the data generated can be exported directly to spreadsheet packages and other software, thus eliminating the need for manual data entry. Measurement can be automated, or at least be made semi-automatic, thus allowing significant time savings (e.g. Hicks et al. 2004)
Basics of digital imaging
back upDigital images are made up of pixels (a contraction of “picture element” ), which can be defined as grid points that are usually displayed on the screen as squares; however, some video cameras and other image capture devices, e.g. some scanning electron microscopes, output rectangular pixels. Each pixel is coded for by varying combinations of underlying binary code (bits), e.g. 01011010. The number of bits in the code is referred to as bit depth and can be varied depending on requirements. Higher bit depth translates into increased information content ( = more grey shades or colours) and hence more realistic images. Typically, bit-depth for greyscale images is 8-bit, whereas typical colour images use 24 or more bits per pixel because the information is transmitted in three separate channels (one each for red, green and blue). File size for a 24-bit colour image is thus triple that of an 8-bit greyscale image of the same size and resolution. Some image formats support only limited colour ranges.
An 8-bit greyscale image can potentially display 256 different shades of grey (2 to the power 8 ), while humans can only distinguish approximately 190 shades of grey under ideal conditions [Baeseler, F. & Bovill, B. (1993). Scanning and Image Processing for the PC. McGraw-Hill, London]. Thus, 8-bit greyscale images usually have a sufficient range for use in light microscopy. Grey-values are coded by numbers 0 to 255, where 0 is black and 255 white. In 24-bit colour images, with each channel coding for 256 shades of red, green and blue respectively. The number of colours is accordingly 2563 = 16,777,216.
However, if the specimen is a mosaic of elements some of which exhibit very little contrast, while others xhibit high contrast, 8-bit images may be insufficient. Some cameras will allow capture of 12- or 16-bit images. File size is correspondingly larger. For example, for a 1000 × 1000 pixel grey-scale image, 8-bit depth will produce a file size (uncompressed) of a little below 1 Mb, whereas 16-bit depth will use a little below 2 Mb.
Can digital imaging of diatoms match film-based imaging?
back upDigital images are more versatile and easier to manipulate than film-based images, but can they match them in the most important aspects, such as resolution of detail and area of image?
There is no general answer. It depends on the particular microscopes, the particular cameras, and the particular objectives and magnifications that are used, and the films with which digital images are compared. In general:
- digital cameras can now equal or surpass film-based cameras in everyday, non-microscopical use
- nevertheless, it takes a very good, expensive digital camera to equal modest film-based cameras, in terms of resolution
- some of the films traditionally used in 35 mm camera backs in photomicroscopes have extremely fine grain. For example, Kodak Technical Pan film (now unfortunately discontinued), when processed with HC110 developer, dilution D, can achieve resolution of up to 200 lines per mm, so that a 35 mm negative can be equivalent to a c. 7000 × 4500 pixel digital image.
- for ×100 oil immersion lenses, both digital and film-based systems can capture all the information contained in an image. Any increase in film or digital image resolution is pointless, because the system is limited not by image capture but by image formation (it is a diffraction-limited system).
- for ×63, ×40 and ×25 lenses (especially oil immersion ×40 lenses), the resolution of the microscope optics may be close to or better than the resolution of the camera: although the observer may be able to see striae on a diatom with these lenses, the camera system may be unable to record them. Clearly, for striae to be recorded in a captured image, the linear density of the pixels or silver grains must be at least twice as great as the linear density of the magnified striae (to allow an alternation of dark-light-dark-light-dark-light etc). In fact, it needs to be significantly higher - as a rule of thumb, five times the minimum. This ratio is not currently achieved in many systems. The better the digital camera in terms of spatial resolution, or the finer the grain of the film, the more likely it is that 'what you see is what you get'.
- the area of the microscope field-of-view sampled by many digital camera systems is small; however, it is easier to stitch together digital images than to collage photographic prints
- overall, if you have a film-based camera, don't assume it's redundant yet. One of the best compromises is to take negatives or colour transparencies and digitize them with a slide scanner.
We discuss some of these issues in greater depth in Bayer et al. (2001)
Choosing the focus
back upOne might wonder why there should be any question of choosing among different focuses. Surely, something is either in focus or out of focus? In daily life, this is true. However, near the limits of resolution of the light microscope, in 'diffraction-limited' systems, it is not true, especially for diatom frustules, because diatom frustules (and valves and girdle bands) are transparent and become visible only because of differences in refractive index between them and their surroundings. Diatom frustules have a refractive index of 1.4-1.43 [Lewin, J.C. (1962). Silicification. In: Physiology and biochemistry of algae (Ed. by R.A. Lewin), pp. 445-453. Academic Press, New York & London]. So, if they are mounted in a medium of refractive index = 1.4, they disappear, just as ordinary glass disappears if placed in immersion oil (both with an RI of 1.515). By contrast, a coloured object will still remain visible, even if placed in a medium of exactly the same RI..
What we see of a diatom frustule, therefore, depends on refraction, reflection and diffraction at the frustule surface. Because of diffraction, small features of the diatom frustule, such as pores, spines, or ribs, appear in focus not once but twice in normal transmitted light: once paler than the background illumination, once darker. These can be referred to as the 'white-spot' and 'black-spot' focuses. When diatoms are mounted, as they usually are, in a medium of higher refractive index than the diatom silica (such as Naphrax or Hyrax, with RI = 1.6-1.7, contrasting with the diatoms' RI = 1.4), the white-spot focus is above the black-spot focus. When diatoms are viewed in water, however, as when they are alive, the order of the focuses ir reversed.
When the objective is focused exactly in the plane of a small object, the object is in fact invisible! So, neither the white-spot focus, nor the black-spot focus is 'correct'. Both are created by diffraction. Which one should choose usually depends on aesthetics and convention, and on which way up the diatom is lying.
When phase contrast optics are used to examine diatoms, there are three foci. The middle, dominant focus shows objects dark against the background. Either side of this and at some distance from it along the optical axis (further than between the white- and black-spot foci formed with bright-field optics), are two fainter focuses, pale against the backgound.
Software programs are available commercially that are claimed by their manufacturers to create all-in-focus images of a specimen from a stack of images focused in different planes. What such software usually does is to find the sharply focused parts of each image in the stack and collage these together to create a summary image. However, for diatoms and other transparent objects, such as desmid cell walls, the outcomes are disappointing, because each small feature is represented by two or more in-focus images of opposite phase, dark and light. When these are combined, they virtually cancel each other out.
Demonstration of white- and black-spot focus
back up to Digital ImagingHere are some examples showing the two different focuses produced in normal transmitted light optics.
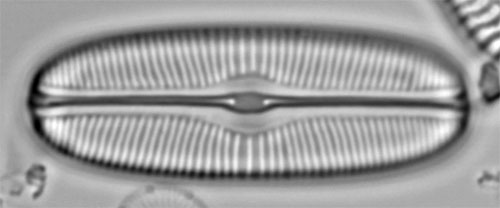
Sellaphora bacillumA valve in white spot focus. The raphe and striae appear pale against the background, which seems intuitively correct because these are slits and pores. However, their appearance is created by diffraction, not by the fact that they are holes 'letting more light through'. |
|
|
The same, in dark spot focus. The raphe and striae appear dark against the background, which is counterintuitive for features that represent lack of silica. However, because this diatom is lying with its valve face uppermost, and because to achieve black-spot focus the microscope is focused slightly lower in the specimen, more of the periphery of the valve appears sharp. Overall, then, the dark-spot focus is preferable, but not because it is inherently more truthful. back to Examples |
|
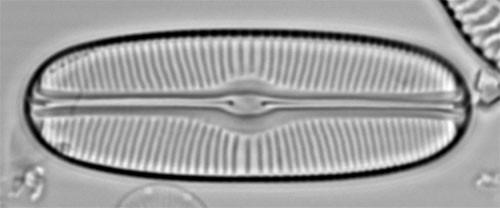
Navicula valveEither focus provides an attractive, useful record of morphology. However, as with the Sellaphora shown above, the black-spot focus is probably preferable, because it captures more information about the valve outline back to Examples |
|
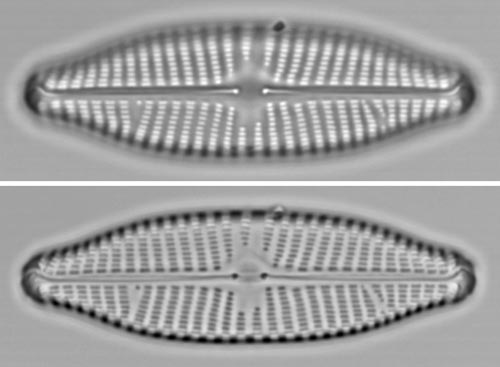
Nitzschia amphibia valveFor the striae, either focus is acceptable. For the valve outline, the black-spot focus (below) is preferable. For the fibulae (the dark structures along the valve beneath top margin), which are solid small bars of silica, only the top photograph is adequate. In this case, there is no image that does justice to everything, but overall, the white-spot focus is probably best. back to Examples |
|
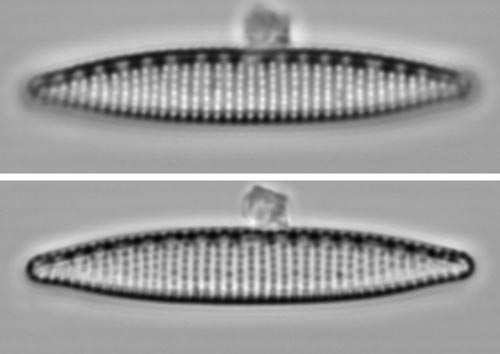
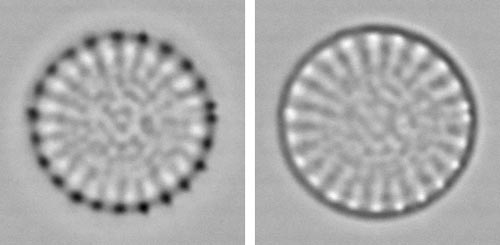
Centric diatomThis tiny centric diatom, just 7 µm in diameter, exhibits readily interpretable structure in the white-spot focus (left), with a crown of spines (black spots) around the margin, peripheral areas where the valve is thinner (between the radial ribs bearing the spines and corresponding to areas of pores), and a more irregular arrangement of pores towards the centre. By contrast, the black-spot focus is almost unintelligible. Here, the white-spot focus is almost obligatory. back to Examples |
|
Suggested protocols for photomicroscopy of diatoms
back upSince neither the white-spot nor the black-spot focus can claim to be 'true', choosing between them is mostly arbitrary. People have different preferences. This is not new. Before photography became easy and inexpensive for recording microscopical images, microscopists had to choose different ways of drawing diatoms, for example in drawings of Petroneis and Epithemia published in A. Schmidt's Atlas der Diatomaceenkunde. However, it may be a good idea to evolve some general principles for digital and film-based photomicroscopy.
Removing dust specks and other artifacts
back upOne huge advantage of digital microscopy is that artifacts can often be removed by simple manipulations. We deal with some of these on a separate page.
Orientation, format, and storage
back upSome recommendations are made on a separate page.