Recording images of diatoms
Photomicroscopy
back upDrawings of diatoms are difficult to do well and different diatomists have their own drawing ‘styles’, which can make it difficult for others to interpret what they saw. So why didn’t everyone give up drawing as soon as photography became widely available, in the mid- to late-nineteenth century? There are probably three main reasons:
- cameras and raw materials were expensive
- until film replaced glass negatives, cameras and negatives were large and processing and printing photographs was tedious
- many diatoms are highly three-dimensional and the depth of focus of oil immersion objectives is very small, so that a single photograph often cannot record more than a fraction of the detail that is visible. A drawing, on the other hand, can combine information from many different focal planes.
Once film replaced glass and miniature cameras became available, photomicroscopy became practical as a routine means of recording images. The depth-of-focus problem could to some extent be circumvented by making multiple exposures at different levels in the specimen.
The main requirements for successful film-based black-and-white photomicroscopy of diatoms are:
- a correctly set-up photomicroscope (hence with full control over exposure times and consistent metering)
- fine-grained film. Kodak Technical-Pan film was until recently one of the best in 35 mm format, but it has now been discontinued
- appropriate use of filters.
The main requirements for successful film-based colour photomicroscopy of diatoms are:
- a correctly set-up photomicroscope (with full control over exposure times and consistent metering)
- fine-grained film (transparency film potentially has higher definition than colour negative film, but has less tolerance to wrong exposure).
- either film that is designed for use with tungsten light sources (which produce a yellowish light), or a combination of daylight film and a suitable ‘daylight filter’ (e.g. 80A)
- a stable light source, allowing good control over its ‘colour temperature’. The quality of light produced by filament lamps depends on their temperature and hence on the voltage applied to them. Unless the same quality of light can be produced repeatedly, obtaining the correct colour balance will be a hit-and-miss affair with many disappointments. Adjusting the colour balance after image capture, either during wet printing or through manipulation of a digitized image, is not easy.
Colour photography of valves and frustules
There is no point in taking pictures of valves and frustules using colour film (unless you are using the colour interference fringes to create a striking effect: e.g. in Actinocyclus), because they have no intrinsic colour. In many cases, using colour film or digital images to record frustule structure simply reveals the inadequacies of colour correction in the microscope lenses, especially when the condenser position and diaphragm are wrongly set.
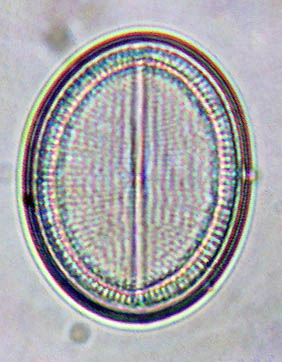
This image of a Cocconeis valve was obtained from the Web (and modified to disguise its origin). The original specimen will have been colourless, but fringes of blue, red and magenta are immediately apparent in the photograph. These colours are pure artefact and add nothing of scientific value to the image. Colour images require more bytes of storage and colour film costs more than black-and-white. Why bother when colour is unnecessary?
Filters in black-and-white photography of diatoms
back upFor cleaned frustules and valves, in order to minimize the effects of chromatic aberration and maximize resolution, it is best to use monochromatic illumination, unless the objectives are of the very highest quality of planapochromats. Many microscopes are most highly corrected for green light (it is very difficult to correct objective lenses for all possible aberrations and all possible wavelengths of light simultaneously). So, it is safest to use a green filter for black-and-white photomicroscopy of cleaned frustules. However, for the highest resolution, blue light would be necessary.
For living diatoms, filters can often make a huge difference to the utility of the image. Diatom chloroplasts absorb blue-green light strongly, because of the presence of high concentrations of xanthophyll pigments, especially fucoxanthin (absorption maximum approximately 500 nm). Hence, using a green or blue-green filter for photomicrographs of living diatoms will make the chloroplasts appear very dark. This is useful if the chloroplasts are thin and delicate, as in some species of high-light environments or if one wants to detect the pyrenoids within the chloroplasts, but it is problematic if the main aim is to examine the nucleus, cytoplasm, golgi apparatus, mitochondria, etc. in living cells. To minimize the contrast between chloroplasts and other cell components, yellow or orange filters should be used.
Living diatoms have yellowish-, greenish- or reddish-brown chloroplasts and different species often have slightly different colours. This variation is obvious to anyone who has studied diatoms from natural habitats, and the differences often persist in culture. For example, Craticula cuspidata chloroplasts are consistently greenish, whereas Navicula menisculus chloroplasts are brown. However, recording these differences is still in its infancy, because of the huge difficulties of maintaining consistent and appropriate colour correction during film-based or digital photography.